2. Instructions

2.1. Collect input image files in a directory
Input image files can only be selected directory-wise. All image files should be the same size and placed in several dedicated sub-directories that are split by type/class (e.g., “normal”, “anomaly01”, “anomaly02”, etc. as follows) before image processing.
<Input Dir>
  + normal
  + anomaly01
  + anomaly02
    :
    :
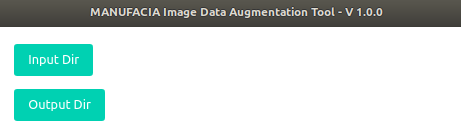
2.2. Specifying input/output directory
Specify a directory where all input images to have data augmentation applied will be read. By pressing the Input Dir/Change button, you can browse and choose an existing directory to read your image from. The selected directory must contain the dedicated sub-directories of images collected in the previous step.
Specify a directory where output images should be saved. By pressing the Output Dir/Change button, you can browse and create a new directory to save your new output images or choose an existing directory to completely replace its content with the new output.
Important
There is a known problem with the version 1.0.0 that images will not be processed if input/output directory contain the string “temp” or “TEMP” in their path name.
There is a known problem that image file processing will fail, if there are non-image files such as thumbnails automatically created by browsing images by Windows explorer or image file viewers. Be sure to delete all those files before starting application.
2.3. Set processing parameters
To set the following parameters, the user can move the slider widget by mouse to quickly adjust values, or use cursor keys for finer setting. Use the up/right keys to increase, and the down/left keys to decrease values by 0.01 to 1 depending on parameters.
2.3.1. Preprocessing parameters
The following parameters can be used for dataset preprocessing. New images/folders will be created.
Tiling: Width/Height
This option will tile the input image into smaller ones in the size of the provided values. The image will be tiled such that the newly created images do not overlap. This function will discard parts of the image that cannot be tiled (algorithm performs integer division of size / input).
This function is particularly useful for cutting a very large image into small tiles so that they can later be used in MANUFACIA. However, it is important to note that once tiled, the output images will need to be reorganized in proper sub-directories manually (e.g., although the large image was of type “anomaly”, not all tiles from this image may present an anomaly. Such normal tiles should, therefore, be moved back to the “normal” sub-directory).
Therefore, it is recommended to perform this preprocessing step alone first, and then operate the other data augmentation methods on the output folder after proper reorganization in sub-directories.

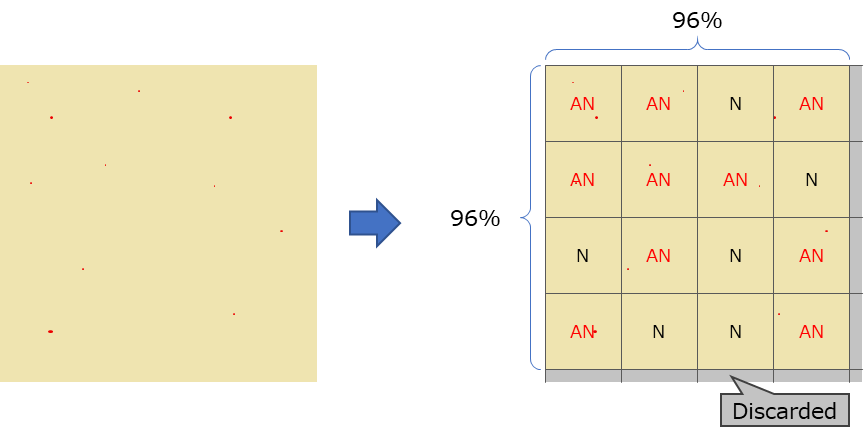
Example: Tiled 24% in width/height
Split percentage
Percentage (0-100) of training data for the output dataset. A percentage of 100 means that the split will not occur. For values below 100, each input sub-directory will be divided into training and testing sub-directories in the output according to the split percentage.
All following transformations will thereafter be applied only to the training sets, leaving all testing sets intact (unless tiling/cropping is applied because these transformations impact the image sizes). The table below details the output folder configuration depending on the split conditions.

a) Using split |
b) No split |
|
|---|---|---|
Input Dir |
Output Dir |
Output Dir |
2.3.2. Augmentation parameters
The following parameters can be used for image augmentation. New images will be created with some deviations based on these parameters.
Repeat number: (1 < n <= 100)
Number of times to repeat the augmentation procedure. To be able to define this number, Split percentage should be activated in advance. The total number of repetitions is distributed over the enabled data augmentations of Brightness, Contrast, Hue, Noise, and Crop.
With the exception of Crop, the random values used by these methods will be generated from truncated normal distributions centered on the input pixel value (no deviation higher than the specified standard deviation; output pixel values are maintained between 0 and 255).

Brightness: Random brightness (0-1) of images to be created
The greater the value is, the wider the range of brightness will be applied to the images. A truncated normal distribution ([255 * N(0, sigma)]) is applied to the input.

Contrast: Random contrast (0-1) of images to be created
The greater the number is, the wider the range of contrast will be applied to the images. A truncated normal distribution ([N(0, sigma)]) is applied to the input.

Hue: Random hue rotation (0-1) of images to be created
This indicates the amount of deviation in color appearance from primary colors (red, green, and blue). A truncated normal distribution ([180 * N(0, sigma) + 180]) is applied to the input.

Noise: Random noise filter value (0-1) to apply to the images
The greater the number is, the more noise the images will have. A truncated normal distribution ([255 * N(0, sigma)]) is applied to the input.

Crop Width/Height/Horizontal overlap/Vertical overlap
The image will be randomly cropped into the given shape (Width and Height), with overlap allowed between crops as specified. Contrary to tiling, this method can be used in combination with other data augmentations provided that the crop Width and Height are large enough to always contain (even partially) the features that characterize the type/class of the images. The upper limit of horizontal/vertical overlap depends on the crop size (width/height).
Overlap settings can only be modified if crop width/height is enabled.

Rotation Max Angle/Angle Steps/Rotation Repeat
Generates random image rotations within the range specified by +/- Max Angle (0 <= Max Angle <= 180) and Angle Steps (1 <= Angle Steps <= 2 * Max Angle). Duplicates the image without repetitions of angle rotation for the specified number of Rotation Repeat (1 <= Rotation Repeat <= Angle Steps). The setting Angle Steps defines the number of equally divided sectors within the range from -max angle to +max angle.
For example, Max Angle of 180 with Angle Steps 4 and Rotation Repeat 4 will operate the rotations 0, +90 degrees, +180 degrees (-180 degrees will be removed due to duplication), and -90 degrees to all images.

Note
Only training datasets in the case where Split percentage is enabled.
If Angle Steps is set to 1, no rotation is applied.
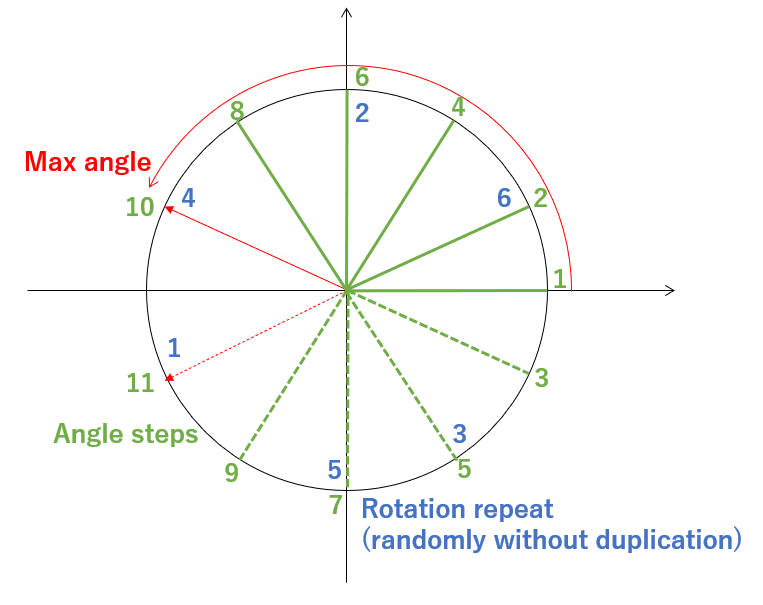
Rotation setting in detail
Horizontal/Vertical Flip
With this option activated, images will be duplicated to include all specified orientations (original and flipped horizontally/vertically).

2.3.3. Postprocessing parameter
Balance
Balances the number of output images of each type to match the size of the smallest output image sub-directory. To thin out sub-directories of bigger size, dataset files to be removed will be randomly chosen.
If Split percentage is enabled, only the training data will be balanced.

2.4. Preview
By pressing the Preview button, you can see how output images will look after processing. Verify that the Output images are as expected and adjust the parameters accordingly before starting the processing.
2.5. Start processing images
By pressing the Start button, image processing will start, and images will be created in the specified output directory.
